April is here!! It's time for daily blogging, lots of visitors and meeting new friends. In other words, time for the Blogging A to Z challenge hosted by Arlee Bird and his team of minions. Thousands of other bloggers from all over the world participate in this blog hop each year, and anyone may join in as long as they blog each day during the month of April, (except Sundays) the blog posts correspond to the appropriate letter for that day, and they sign up on the link list. Simple!
A few favorite things I use in my art show up in today's line-up: Stencils, Stamps and Shimmer.
I have talked about stencils here a bit, because I use them for modeling paste and glass bead gel a lot. I also use them with spray inks, and have quite a large collection of these little plastic jewels.
Stamps are another popular tool with mixed media artists, and while I used to think a stamped image must be perfect, squared, and colored exactly, I have certainly changed my tune! I no longer look for elaborate design stamps, but instead prefer stamps that either say something or give impressions rather than exact images. Here is an example of some I have been lusting for...Actually the site I had hoped to feature apparently sold out of the sets I had been eyeing, but they will probably come back again later.
I do have a smallish (comparatively speaking) collection of stamps. My favorite are the clear stamps, but the images are (supposedly) better with red rubber stamps. Those can be purchased mounted or unmounted. I am a big fan of unmounted stamps because they take up less space.
My last S word for today is shimmer. Oooh. I love shimmery goodness! In fact I have a rather large array of products that provide shimmer and sparkle in my art.
Thank you for stopping by today! I hope you enjoyed your visit!
Showing posts with label Silks Acrylic Glaze. Show all posts
Showing posts with label Silks Acrylic Glaze. Show all posts
Wednesday, April 22, 2015
Sunday, June 22, 2014
Journal Pages and Cover
My pen friend Karen received her ojswap journal almost six months after it was started, and was sad to find several blank pages within. So she asked if I would do another spread to help her fill it up. She hadn't decorated her cover either, so I offered to do the front. Here are pictures.

I covered the front with gesso to give it a clean surface, then adhered printed tissue paper and a few torn squares of lime green tissue with matte gel medium. I cut the letters free hand from a variety of papers except for the Tim Holtz playing card A.

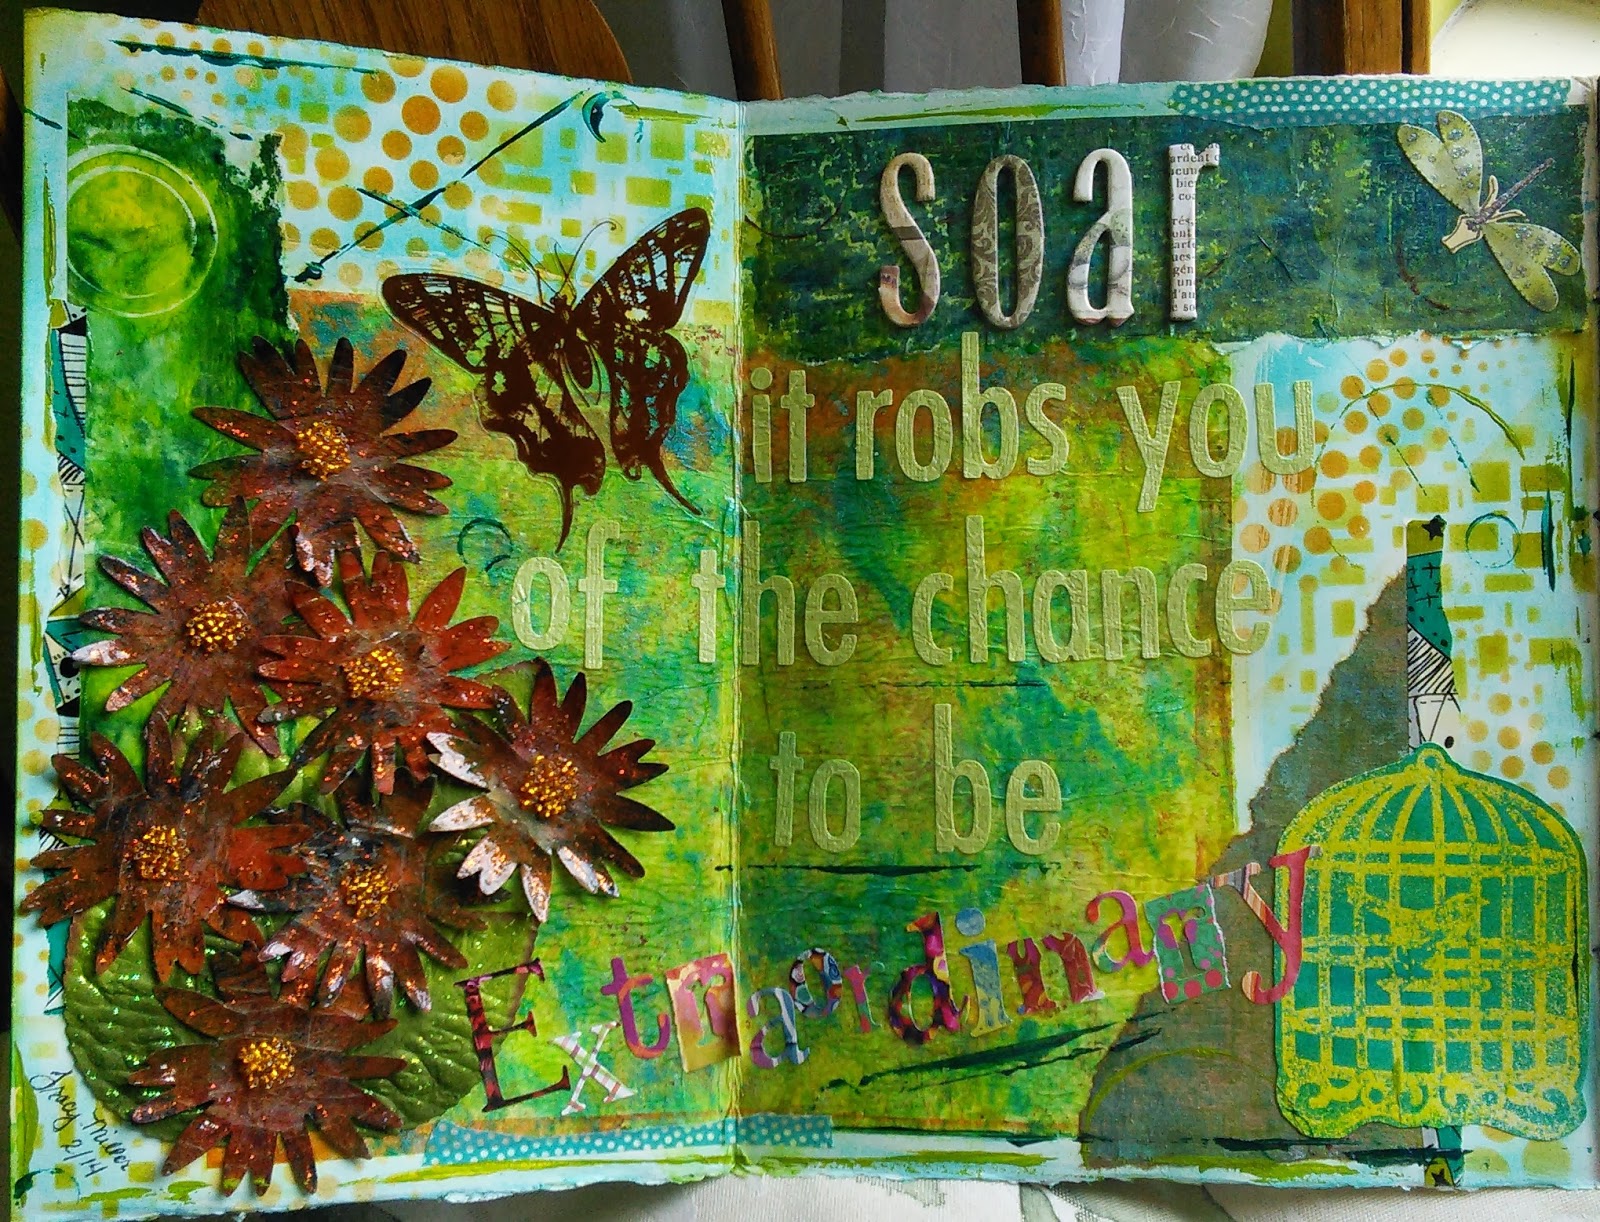
Here is the spread. Below are closer shots of each page. The background is twinkling H2O watercolors dribbled on, then manipulated with bubble wrap and a baby wipe. The banner flags are gelli-prints, all but one are made by me, the r is on one made by my friend Jonathan. The spread took me a full (long) day to create.


I wove some strips of paper (mostly gelli-prints) behind the f. The bicycle is stamped and embossed in white. The flowers between the r and i banners are torn bits of washi tape. The letters are stamped with making memories foam stamps using distress paint by Ranger.
I always try to use some washi tape on my artwork, and on these pages, in addition to the torn strips along the top left and bottom right pages, I cut pieces to hang the flags on the green eyelash yarn, a leftover from my daughter's last shawl. The feather on the d flag is cut from the front of a pen pal letter-- a bit of recycling... The little flower pot is actually metal, and the leaves and flowers came from other pen pals.
I have one more single page to do before I send it on to another pen pal to work in. I got some new alcohol inks yesterday and plan to do something with them. Happy Sunday!
Sunday, June 1, 2014
Art Journals
Once again I have been away from my computer, thus these projects haven't been posted. First up, a couple of art journals in a round robin swap. I didn't get a side-by-side view of the first pages, but they were for a person who mentioned feathers, flowers, and dragonflies as some of her favorite themes, so I created pages with that in mind. Gelli-print backgrounds (I tore two up to use because one wasn't big enough. It added more color, anyway!)
 The flowers are punched, the word feathers is stamped and embossed, the words dragonfly and wings are stickers, and the feathers on the side are stenciled modeling paste that I added a bit of distress ink to. The & is chipboard.
 On this page, the words are, magical and things are all stickers. (Yup, I have a LOT of alpha stickers!!) The word Quite is rub-on letters, and the word wonderful is cut with QuicKutz die cutting system. The flowers on the right are glass bead gel pressed through a stencil, then painted lightly with distress paint. Note, on both pages there are bits of washi tape. Because I can. :)
The next journal is probably my least favorite of all I have done, but only because I am not a pastel pink, shabby-chic, romantic type of person. Give me some ORANGE! Some BOLD! I like my colors to vibrate!! So, even though this style appeals to a LOT of people, it isn't me. BUT, I rose to the occasion and created what I hope will make her happy. :)
 The background started as a sheet of Tim Holtz tissue. I painted over it with distress paint, then around the edges added some white acrylic paint. I layered on some tattered rose distress ink, and later some vintage photo distress ink. I spritzed with Tattered Angels glimmer mist, although it is REALLY faint and hard to see it. The left side is a strip of gelli print, then I used lace, flowers, pink pearl trim, a title page from an OLD hymnal that had been mouse eaten (so I just tore it up a little more...) some washi tape, and the metal embellishment from a greeting card someone had sent me a couple of years ago. The heart was super shiny, so I roughed it up with a wire brush, then added pale pink and latte colored alcohol inks to it. Several layers of that finally started giving it more of a distressed look. The flowers are layered, the outer pink flowers were the last of those left over from Ryan and Ale's (our son) wedding five years ago, and the little satin centers were from a set I got a few years ago. I didn't have any creamy colored brads for the centers, so I added a drop of dimensional paint to the center of each white brad. I wove the pearl trim around through the flowers, and I thought it was just enough to frill it up without being too ostentatious.
 The right page started with a piece of patterned paper, beneath the tissue, but the pattern was lost beneath all the layers, so I may as well have skipped it. It did give the page a little more substance, but otherwise only served to lighten my overburdened stash of scrap papers. The fan is more of the gelliprint I used on the left panel, embellished with a bit of ribbon and fiber. I laid a couple of rubberized leaves (cream) beneath it, but you may not be able to see it in the photo. The brown flowers down the center are rub-ons, the little fairy is a scrabble tile someone sent to me.
And here the spread is all together. I think I have used up all my pastel goodies now, so I have an excuse to say, "I can't do that." :)

The next journal is probably my least favorite of all I have done, but only because I am not a pastel pink, shabby-chic, romantic type of person. Give me some ORANGE! Some BOLD! I like my colors to vibrate!! So, even though this style appeals to a LOT of people, it isn't me. BUT, I rose to the occasion and created what I hope will make her happy. :)
And here the spread is all together. I think I have used up all my pastel goodies now, so I have an excuse to say, "I can't do that." :)
Monday, February 10, 2014
Altered Files, Birthday Presents, and Happy Mail
Happy Monday! Ornery and I had a productive weekend! Here are a few pictures of the fruits of my labor. (another post will feature HIS projects!)
Friday my birthday gift from Ornery arrived in the form of new colors of silks, twinks and primary elements artist pigment powders. Oh, glorious day!! :) My birthday isn't until next week, but we celebrate from the beginning of the month... :)

Also in the mail was my order from Stampin' Up. They offered in their clearance section some 8X8 albums for $5.99. They are 3 D-ring binders and came with 10 sheet protector/pages inside. I had been planning to make a stencil binder for storing my 6X6 stencils in, but I am sure I couldn't make one for $5.99, so I ordered two. I only needed one binder for stencils, but both sets of pages. I am going to use the other for a Mail Art Junk Journal.
 Outside cover...^^ and below is what it looks like with some stencils parked inside. :)

Saturday I worked on my own art journal for a round robin swap with two pen friends. Here is one of the pages--I apparently forgot to photograph the other one!
 It was an accidental theme, as when I was spritzing the page with spray ink, over-spray got onto all the little paper dresses I had set aside for the page. Oh, well. It's the truth!
Sunday I broke out the Gelli-plate for another session. I created 35 beautiful monoprints! :)

Next, I put together some altered file folders and a couple of post cards. One folder is for a swap, the other is for my new Mail Art Junk Journal. Here is a pile of completed projects from Sunday.

And here is a photo of the outgoing mail for Monday. I put together some surprise Valentine's presents for a couple of my nephew's kids and my two grands. The other items are my journal and a couple of swaps, plus the post card going to an Instagram friend.

Here is my folder front and back.


and here is the folder I made for the swap, front and back. Note the stitching. It happened here. Really.

 That's all folks!
Friday my birthday gift from Ornery arrived in the form of new colors of silks, twinks and primary elements artist pigment powders. Oh, glorious day!! :) My birthday isn't until next week, but we celebrate from the beginning of the month... :)
Also in the mail was my order from Stampin' Up. They offered in their clearance section some 8X8 albums for $5.99. They are 3 D-ring binders and came with 10 sheet protector/pages inside. I had been planning to make a stencil binder for storing my 6X6 stencils in, but I am sure I couldn't make one for $5.99, so I ordered two. I only needed one binder for stencils, but both sets of pages. I am going to use the other for a Mail Art Junk Journal.
Saturday I worked on my own art journal for a round robin swap with two pen friends. Here is one of the pages--I apparently forgot to photograph the other one!
Sunday I broke out the Gelli-plate for another session. I created 35 beautiful monoprints! :)
Next, I put together some altered file folders and a couple of post cards. One folder is for a swap, the other is for my new Mail Art Junk Journal. Here is a pile of completed projects from Sunday.
And here is a photo of the outgoing mail for Monday. I put together some surprise Valentine's presents for a couple of my nephew's kids and my two grands. The other items are my journal and a couple of swaps, plus the post card going to an Instagram friend.
Here is my folder front and back.
and here is the folder I made for the swap, front and back. Note the stitching. It happened here. Really.
Friday, February 7, 2014
Two Art Journals
I am participating in two separate art journal round robins, one with three people and one with eight. The swap with 8 people has 7 US residents and one in Scotland, so the originator of the swap is sending around her journal and the out-of-country journal together. Both arrived at my house this week, and I have been hard at it creating something I would like for others to see. I also am in possession of my own journal for the other swap, and haven't started working in it yet--that's next!
Here are photos of the pages I did in the two albums.
 Both albums had a variety of types of pages inside, and since most people seemed to prefer the single-no-flap variety, I opted for one with a flap. Turns out I was a glutton for punishment! Anyway, the first photo, above, is the outside flap of the page. I inked the page then tore strips of sheet music painted with twinkling H2O watercolors and loosely wove it. There is washi tape, a bit of acrylic paint smudged and strategically placed here and there, and it may not really LOOK like a million letters, but when you are punching them out, it sure seemed like it!! I used my QuicKutz dies to do the letters, then grunged them up with ink and stamps. (click on the image if you want to see it bigger.)
 This is the inside of the spread. After I inked all over the page, I used strips of paper I had painted on with my Gelli-plate and added them here and there. Then I used orange and green distress ink with stencils to make the patterns. The bird cage clip art is actually stamped using a wooden stencil a friend gave me. I embossed it with clear embossing ink, then sprayed the whole thing with the blue ink. The embossed areas resisted the ink, leaving a lovely image.
The flowers are also punched from gelli-plate prints, using a zinnia punch. After I punched them, I dredged them in embossing ink, then ultra thick embossing enamel (UTEE). By reheating the UTEE I was able to add a couple more layers of the powder, and then melt it again. It gives a hard plastic looking finish. For the centers, I dropped some Glossy Accents (Ranger) in the center, then scooped some glass seed beads onto the glue. Once it was all dry, I accented it with some paprika colored stickles glitter glue. I don't know how well it will stay, but I was afraid to melt the UTEE anymore, especially since it was already in the book.
The owner of this second journal prefers bright colors (Yay!) but no sparkly glitter (Boo!). But, I am not deterred! I started on the flap with a piece of deli wrap I had painted with silks acrylic glaze on my gelli-plate. Then I added the pattern piece, just to give it some color and added interest. The circles were torn from a piece of fun tissue paper I got in the mail a while ago. I used the same circles on the far right side of the inner spread, which you can see in the next photo.
 The hearts are made with glass bead gel, which is shiny without being sparkly! :) I outlined them with black so they would show up better, since the gel is clear. I think in the future, I will ink or paint the areas using the stencil so they will show better.
 This is the full effect of the first page.
 And this is the whole inside layout. The flowers on the left were all punched from yellow card stock. I punched the center out of them and used UTEE on them so they would be shiny, then I painted the petal part with silks acrylic glaze. After it was dry, I drew in the black designs. This person really likes patterns, so I tried to incorporate a lot of them on the design. In the center of the page, I used more glass bead gel with a triangle stencil, then I reset the stencil and drew more triangles from the stencil that I had not used before with the gel. There is washi tape, ribbon, and various types of paper, plus the little heart on the book pocket is made of polymer clay. (I didn't make it.)
 Here is a close-up of the pocket. Her name begins with a T, so I used that on the front. The chipboard letter was originally plain, I added the orange gelli-print onto the top and embellished it with yarn and the heart paperclip.
 The tag is made of security envelope linings. I have been saving them for just such a purpose! The various other words and designs are all rub-on embellishments I have had for a while.
That was two full days of art, but I feel really good about my offering in their journals. It leaves in the morning for the next stop!
Here are photos of the pages I did in the two albums.
The flowers are also punched from gelli-plate prints, using a zinnia punch. After I punched them, I dredged them in embossing ink, then ultra thick embossing enamel (UTEE). By reheating the UTEE I was able to add a couple more layers of the powder, and then melt it again. It gives a hard plastic looking finish. For the centers, I dropped some Glossy Accents (Ranger) in the center, then scooped some glass seed beads onto the glue. Once it was all dry, I accented it with some paprika colored stickles glitter glue. I don't know how well it will stay, but I was afraid to melt the UTEE anymore, especially since it was already in the book.
The owner of this second journal prefers bright colors (Yay!) but no sparkly glitter (Boo!). But, I am not deterred! I started on the flap with a piece of deli wrap I had painted with silks acrylic glaze on my gelli-plate. Then I added the pattern piece, just to give it some color and added interest. The circles were torn from a piece of fun tissue paper I got in the mail a while ago. I used the same circles on the far right side of the inner spread, which you can see in the next photo.
That was two full days of art, but I feel really good about my offering in their journals. It leaves in the morning for the next stop!
Thursday, January 9, 2014
Home Alone
After company for Ornery's birthday and a full week of overnight company, Ornery and Elizabeth (who had the flu earlier in the week) are finally back at work, my sister and brother-in-law are on the road headed back to Tucson, and the house is empty for a few hours, except for little ol' me!
The construction project, while fraught with challenges and accidents, is mostly complete. We have a wall, French door with knob and lock, window, power, (which was quite a feat requiring a new breaker box, ceiling outlets, wall outlets and a new exterior porch light, exhaust fan motors...) HVAC connected to the main house with return air vent, exhaust fans and insulation overhead and in the wall. The green-board sheet rock is up on the inside wall and other than a bit of sanding, ready to paint. The exterior hardi plank siding is up and also ready to receive paint.
There were weather related issues to deal with throughout, since the entire country experienced record breaking cold temperatures. Fortunately, we had a propane heater, and borrowed Ornery's mom's double burner model, so the guys were able to pour the floor leveling material (required to install the door on a level surface) and dry the joint compound on the sheet rock so it could be sanded.
CW spent about 10 hours in the attic on that coldest day since 1912, and was so cold when he finally came down his feet were too numb to balance on the beams and he almost fell through our bathroom ceiling. The only actual casualty was the staple gun he had in his hand which he flung in his effort to grab hold of something to break his fall, and because of the deep insulation, he was unable to locate it. The project was rather hard on staple guns. I think they ended up breaking/buying 3 or 4 by the time it was all done!
The blown insulation was a three person job requiring two in the attic yelling instructions to the third person in the garage tending the machine. In the end I think they broke that as well as part of Ornery's shop vac. Other than those casualties, however, I haven't heard of any other disasters.
Ornery is delighted to be so far along on the project, although he has a whole lot more work to do before we are close to ready to start planting any seeds, but overall it was worth the wait for CW and Mimi to be able to come.
Mimi did a lot of the cooking while they were here. She is more of a foodie than I am, and frankly, I tend to just throw something together at the last minute and hope for the best. Not her! We ate high on the hog for a whole week, and that without gluten, sugar or (for me) any dairy or nightshade foods! Other than the cooking, however, I had her steadfastly occupied in my studio making her first Artist Trading Cards, some greeting cards, and on the last day, prints on my new Gelli-plate printing plate. Of course I was occupied in similar pursuits, and have a few photos to show for my week's worth of absence from the blogosphere...
 Elizabeth finished the green shawl she had on the loom before Christmas, and came over one afternoon and started this new one for Michael's sister.
The first day in the studio with Mimi, we got out the Twinkling H2O watercolors and painted assorted random papers. Then we played with them. This ATC was made using some emboss resist (chicken wire stamp) and the Twinks. I was all set to swap it until Mimi said she wanted one just like it, so I gave it to her. :)
 This is a post card for a SwapBot swap called Gift-wrap Mail Art. I used tissue paper for the background, added washi tape and flowers, sealed it all with gloss gel medium, and then added the flowers, brads and eyelash yarn on the right side. I was going to send it "naked" but in the end put it inside a clear plastic sleeve for mailing. No point in clogging up the mail machines, right?
 After we finished with the Twinks, I showed Mimi how to use Alcohol Inks. This background paper was just a slick white paper I added various ink drops to. I applied the felt applicator to parts of it, and used a coffee stir stick to "blow" to make the runs. I stamped a jar image on some silver vellum, added the gold cap with liquid pearl, and stuck on the little asparagus spears I had in my stash.
 Then I decided to just get busy and make a few ATCs for trading. This one is using some new papers I got for Christmas in a 6X6" paper pad. Nothing extraordinary, but certainly fun!
 I ended up sending it to one of my pen-friends inside this card. I found the stamp of the little chick in the clearance bin at Hobby Lobby on the day Mimi and I were sent on some errands for the guys. We took a rather long side-trip to HobLob and spent my Christmas gift card (plus a bit more) and Mimi bought some yarn for Elizabeth to make a shawl for her, along with a few fun paper crafting items.
 Another card I made using the paper pad...
 Then we got out the modeling paste and silks acrylic glaze. This was my first attempt at using a rubber stamp on the surface of the paste. I didn't care for the result of that part, but by the time I added inks and silks to the ATC, I was pretty pleased with the final product. It traded right away, so someone else liked it, too! :)
 After my success with the modeling paste on the first one, I decided to just get several cards out and play with it some more! This one (and the ones following) were painted white with acrylic paint, then spritzed with Dylusions spray ink. Then I applied modeling paste through various stencils, some of which I mixed with the over-sprayed ink on the mat, then highlighted with silks acrylic glazes. And a bit of Stickles, glitter glue. The little butterflies are punched out of scraps...
 This one uses just little spots of the modeling paste, a little tab I cut from some QuicKutz dies, a torn bit from one of the papers we painted with Twinks, some washi tape, and a wire tree. I used silks around the edge of the card to add a bit more dimension and sort of frame it.
 This one was probably my favorite. The white acrylic paint on the surface of the card mixed with some inks left the base pretty shiny. The modeling paste has no shine whatsoever, so you can really distinguish the outline of the stencil I used as an imprint. I added drizzles of silks over it and around the edge, then I used a heat gun on it to make the paint bubble up. When it cools, the uneven surface gives an interesting texture.
The hearts are cut from scraps of old Russian sheet music I had in my scrap box, and I edged them with gold stickles.
 For this ATC, I squeezed some modeling paste onto the surface of the card and used a notched tool to drag through it and give it some shape. Once it was dry (and very WHITE) I decided to add some Key Lime Silks acrylic glaze. I applied it with a stick, so it is pretty thick on the surface of the modeling paste, but it is almost eye-popping bright under the lights. I love the shimmer of those glazes!!
 For this ATC I used a clock stencil with some colored modeling paste (mixed in some ink from the overspray) then sealed it with gloss gel medium. The other accents are washi tape, Tim Holtz metal embellishment and Eyelet Outlet doggie brad. It is my last dog brad, and I think I may need some more of those!! :)
 Yesterday, which ended up being a bonus day since they were able to stay longer than originally planned, Mimi and I got out my new Gelli printing plate. We started out using my acrylic craft paints but quickly discovered that we liked the look we got from the Silks much more, so we ended up going back and applying silks to all the first prints we made. After they were all dry, I cut them in half so we each got to keep 1/2 our work. It was time consuming and very messy, but we both had a great time with it and I am sure I will get it out often to make background papers for future projects.
So, that was my week! I will post photos of the before and after garden room once we get a little further along. I would like to get some of the mess cleaned up before I put photos out there for general consumption! :)
The construction project, while fraught with challenges and accidents, is mostly complete. We have a wall, French door with knob and lock, window, power, (which was quite a feat requiring a new breaker box, ceiling outlets, wall outlets and a new exterior porch light, exhaust fan motors...) HVAC connected to the main house with return air vent, exhaust fans and insulation overhead and in the wall. The green-board sheet rock is up on the inside wall and other than a bit of sanding, ready to paint. The exterior hardi plank siding is up and also ready to receive paint.
There were weather related issues to deal with throughout, since the entire country experienced record breaking cold temperatures. Fortunately, we had a propane heater, and borrowed Ornery's mom's double burner model, so the guys were able to pour the floor leveling material (required to install the door on a level surface) and dry the joint compound on the sheet rock so it could be sanded.
CW spent about 10 hours in the attic on that coldest day since 1912, and was so cold when he finally came down his feet were too numb to balance on the beams and he almost fell through our bathroom ceiling. The only actual casualty was the staple gun he had in his hand which he flung in his effort to grab hold of something to break his fall, and because of the deep insulation, he was unable to locate it. The project was rather hard on staple guns. I think they ended up breaking/buying 3 or 4 by the time it was all done!
The blown insulation was a three person job requiring two in the attic yelling instructions to the third person in the garage tending the machine. In the end I think they broke that as well as part of Ornery's shop vac. Other than those casualties, however, I haven't heard of any other disasters.
Ornery is delighted to be so far along on the project, although he has a whole lot more work to do before we are close to ready to start planting any seeds, but overall it was worth the wait for CW and Mimi to be able to come.
Mimi did a lot of the cooking while they were here. She is more of a foodie than I am, and frankly, I tend to just throw something together at the last minute and hope for the best. Not her! We ate high on the hog for a whole week, and that without gluten, sugar or (for me) any dairy or nightshade foods! Other than the cooking, however, I had her steadfastly occupied in my studio making her first Artist Trading Cards, some greeting cards, and on the last day, prints on my new Gelli-plate printing plate. Of course I was occupied in similar pursuits, and have a few photos to show for my week's worth of absence from the blogosphere...
 |
| Add caption |
The hearts are cut from scraps of old Russian sheet music I had in my scrap box, and I edged them with gold stickles.
So, that was my week! I will post photos of the before and after garden room once we get a little further along. I would like to get some of the mess cleaned up before I put photos out there for general consumption! :)
Subscribe to:
Posts (Atom)